
With an abundance of information available on core training, it can be challenging to know what exercises you should do, not to mention how many reps, how much load, how quickly and how often. With this short, simple training plan, you’ll challenge your core musculature in every way possible.
Each day has different movements with a different focus: stability, coordination, muscular endurance, strength and power for a well-rounded and science-based approach to functional core training. And, better yet, these exercises only take about 5–10 minutes of your day!

DAY 1: STABILITY AND MOBILITY
Day 1 focuses on creating stability throughout the spine and firing the deeper core musculature that provides a strong foundation for the rest of your movements.
For each of these exercises, perform 10-second holds with a 3-second reset for 10 rounds.
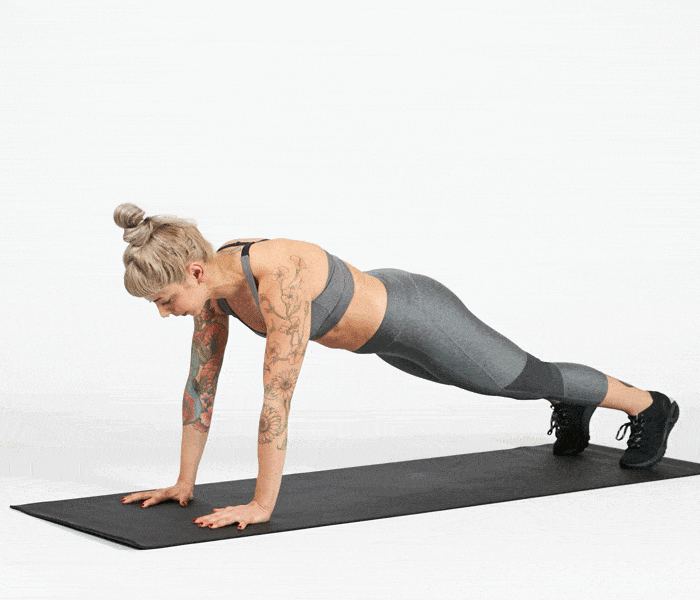
HIGH PLANK

How to do it:
Place your hands on the ground directly under your shoulders, brace every muscle of your body and hold a perfectly straight line from your head to your heels. For the reset, gently set your knees to the floor, count to 3 and press back into the strong plank hold.
BIRD DOG
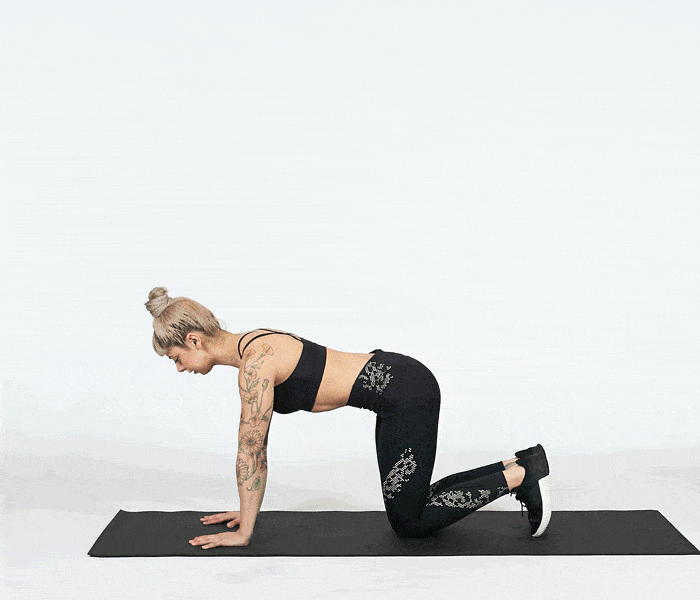
How to do it:
The bird dog is a co-contraction of one leg and the opposite arm in the quadruped position. Begin on your hands and knees, with your hands directly under your shoulders and knees directly under your hips. Find a neutral spine and gently brace your core. Lift one arm in front of you while lifting the opposite leg behind you until there is a straight line from your lifted hand to your lifted heel. Sweep the floor with your hand and knee after each 10-second hold.
GLUTE BRIDGE
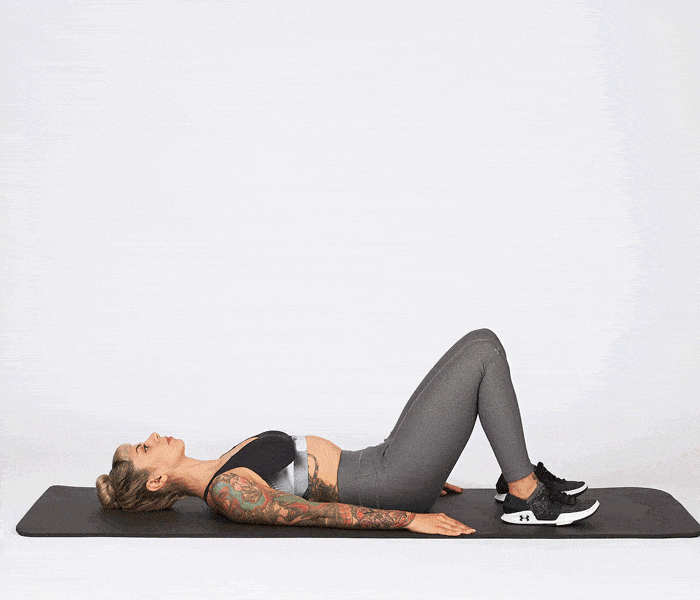
How to do it:
Lie flat on your back with your knees bent and feet flat on the floor. Squeeze your glutes and lift your hips off the ground, so your knees, hips and shoulders are in a straight line. Hold for 10 seconds and return to the floor.
DAY 2: JOINT STABILITY AND UNILATERAL TRAINING
Training unilaterally (one side of the body at a time) creates the perfect environment for strengthening the core stabilizers. To resist rotation and bending, these deep core muscles must activate and aid in controlling the movements.
Perform two sets of 10 of each exercise on each side of the body.
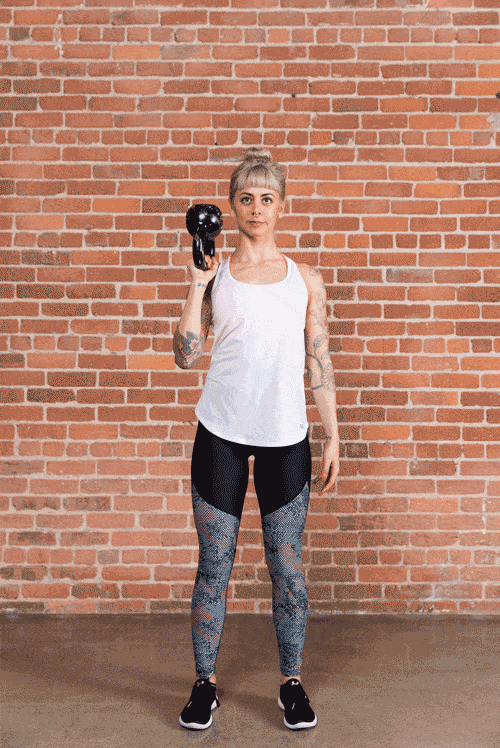
KETTLEBELL RACK CARRY

How to do it:
For this exercise, select a medium-to-heavy kettlebell or dumbbell, hold it in one hand in a racked position (just inside the shoulder) with minimal upper body movement or swinging for 10 steps. Repeat on the other side.
KETTLEBELL WINDMILL
(Watch an example of this move here.)
How to do it:
Take a wide stance and point both toes 45 degrees to the left. Place a kettlebell or dumbbell in your right hand and extend that arm overhead. While keeping your eyes on the bell, pop your right hip out and hinge sideways while maintaining a neutral spine. Bend as low as you can with a flat back, trying to touch your left toes, then extend your hips and press the weight back up to the ceiling. This movement should be performed with straight legs, and always slow and controlled.
TURKISH GET UP (FIRST HALF)
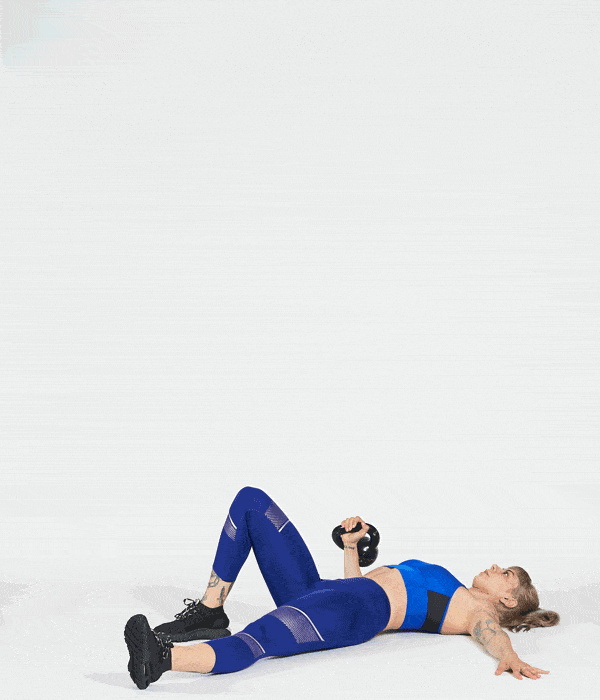
How to do it:
Lie on your back and hold a light to medium kettlebell in your right hand directly in the air above your shoulder with a straight arm. Plant your right foot firmly flat on the floor and left arm out to your side, and begin to press the kettlebell up toward the ceiling while rolling to your left shoulder, then elbow, then hand. Keep your right arm straight and core braced the entire time. Slowly work that movement in reverse and repeat.
DAY 3: ENDURANCE
By increasing the duration of loaded movement and minimizing the rest breaks, you increase your muscular endurance and aerobic capacity.
For Day 3, perform 20 reps of each exercise, flowing directly into the next movement for 3 rounds.
SIDE PLANK WITH BAND ROW
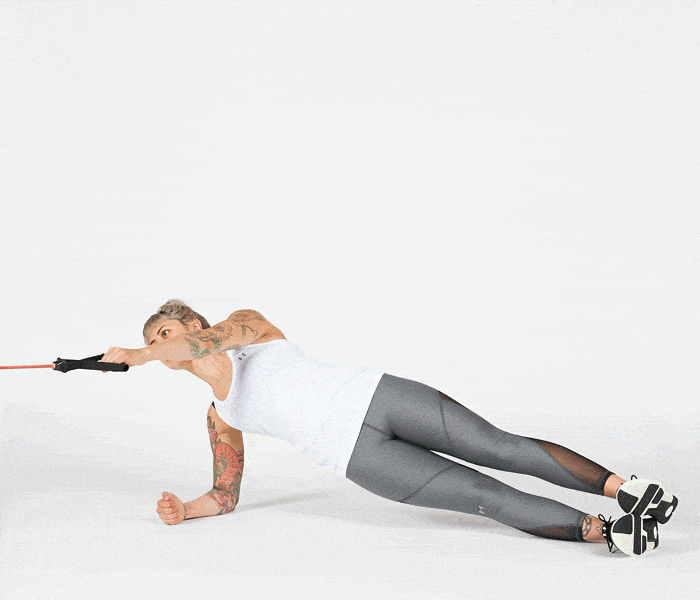
How to do it:
Attach a long band to a stable anchor about 1 foot off the ground. Face the anchor point with your right forearm on the ground, your elbow directly under your shoulder. Press up into a strong side plank, maintaining a straight line with your ears, shoulders, hips and heels. Grab the end (or handle) of the band with your left hand. While avoiding rotation and without any slack in the band, pull the handle of the band with your left hand to your ribcage and return. After 20 reps, repeat on the other side.
HALF-KNEELING KETTLEBELL HALO

How to do it:
Kneel on one knee and place the other foot flat on the floor with a bent knee. Hold the horns of the kettlebell directly below your chin. Rotate the kettlebell around your neck, keeping the circle as tight as possible. Keep your core braced and ribs tucked in as you move. After 20 reps, repeat in the other direction.
PLANK WALK DOWN
How to do it:
Place your hands on the ground directly under your shoulders, brace every muscle of your body and hold a perfectly straight line from your head to your heels. With minimal movement or rotation, drop down to the right forearm, followed by the left. While maintaining a tight midsection, push back up to the high-plank position, one arm at a time.
DAY 4: STRENGTH
Once a skill has been learned, force can be added to aid in recruiting more motor units, including those type-2 fibers that build strength and definition!
For Day 4, complete 3 sets of 8 repetitions on each side, choosing a load you can move safely and correctly, yet leads to near failure on the last movement.
KETTLEBELL OVERHEAD CARRY
How to do it:
Similar to the racked carry, you will hold a fairly heavy kettlebell or dumbbell overhead in one hand, directly above the shoulder, in a strong, stable position. Walk for 8 slow steps. Avoid swinging, bending or excessive rotation while walking. Repeat with the other arm.
PALLOF PRESS

How to do it:
Adjust a cable machine or anchor a resistance band so the handle lines up just below your shoulders. Stand sideways to the anchor point and hold the handle with both hands, then bring the cable/band to the center of your chest. In a slow and controlled motion, press both hands out in front of your body, then return to the center of the chest. Keep your entire body tight and braced, avoiding any movement other than the arms straightening and bending.
KETTLEBELL RENEGADE ROW
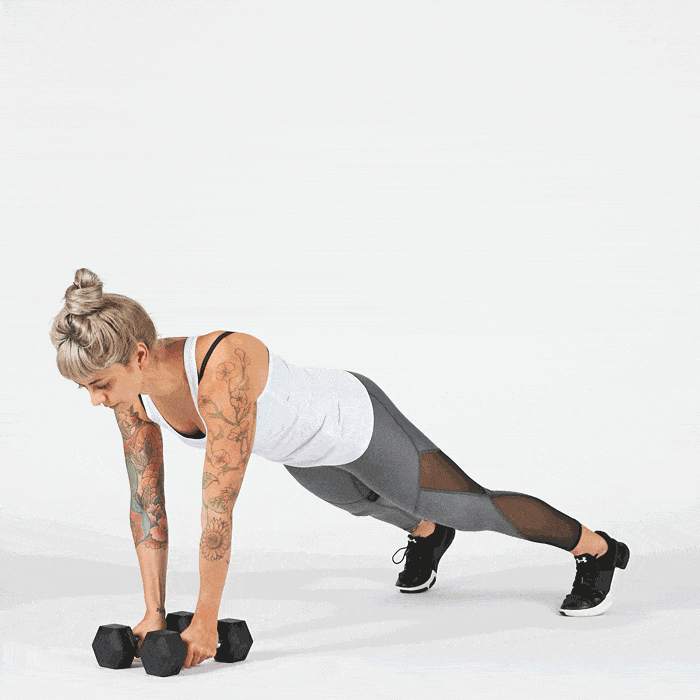
How to do it:
Place two dumbbells on the ground directly under your shoulders, and grip the handles with both hands. Brace every muscle of your body and hold a perfectly straight line from your head to your heels, feet wide for support. While avoiding rotation, row one dumbbell up and back, squeezing behind the shoulder blade. Place the dumbbell back on the ground with control, and switch to the opposite side. Avoid letting the hips sag (especially during the row) to prevent low-back pain and potential injury.
DAY 5: POWER
Power is a result of adding speed to the force we are already moving. By increasing the velocity of the force production, you can burn more calories, activate more type-2 muscle fibers, create more of an anaerobic challenge and become an overall better athlete. However, it is essential that a strong foundation of core stability, endurance and strength is laid down first.
Complete each exercise for 2 rounds with proper form and maximum power for 30 seconds of work, followed by 1 minute of rest.
KETTLEBELL SWINGS

How to do it:
Select a medium-to-heavy kettlebell weight. With an overhand grip, hold the handle of the kettlebell with both hands. With a neutral spine and braced core, hinge the hips back, squeeze your glutes and press your hips forward with speed and power. The kettlebell should “float” out directly in front of the body, stopping no higher than your shoulders. Return to the hinge position and repeat.
BATTLING ROPES ALTERNATING WAVES
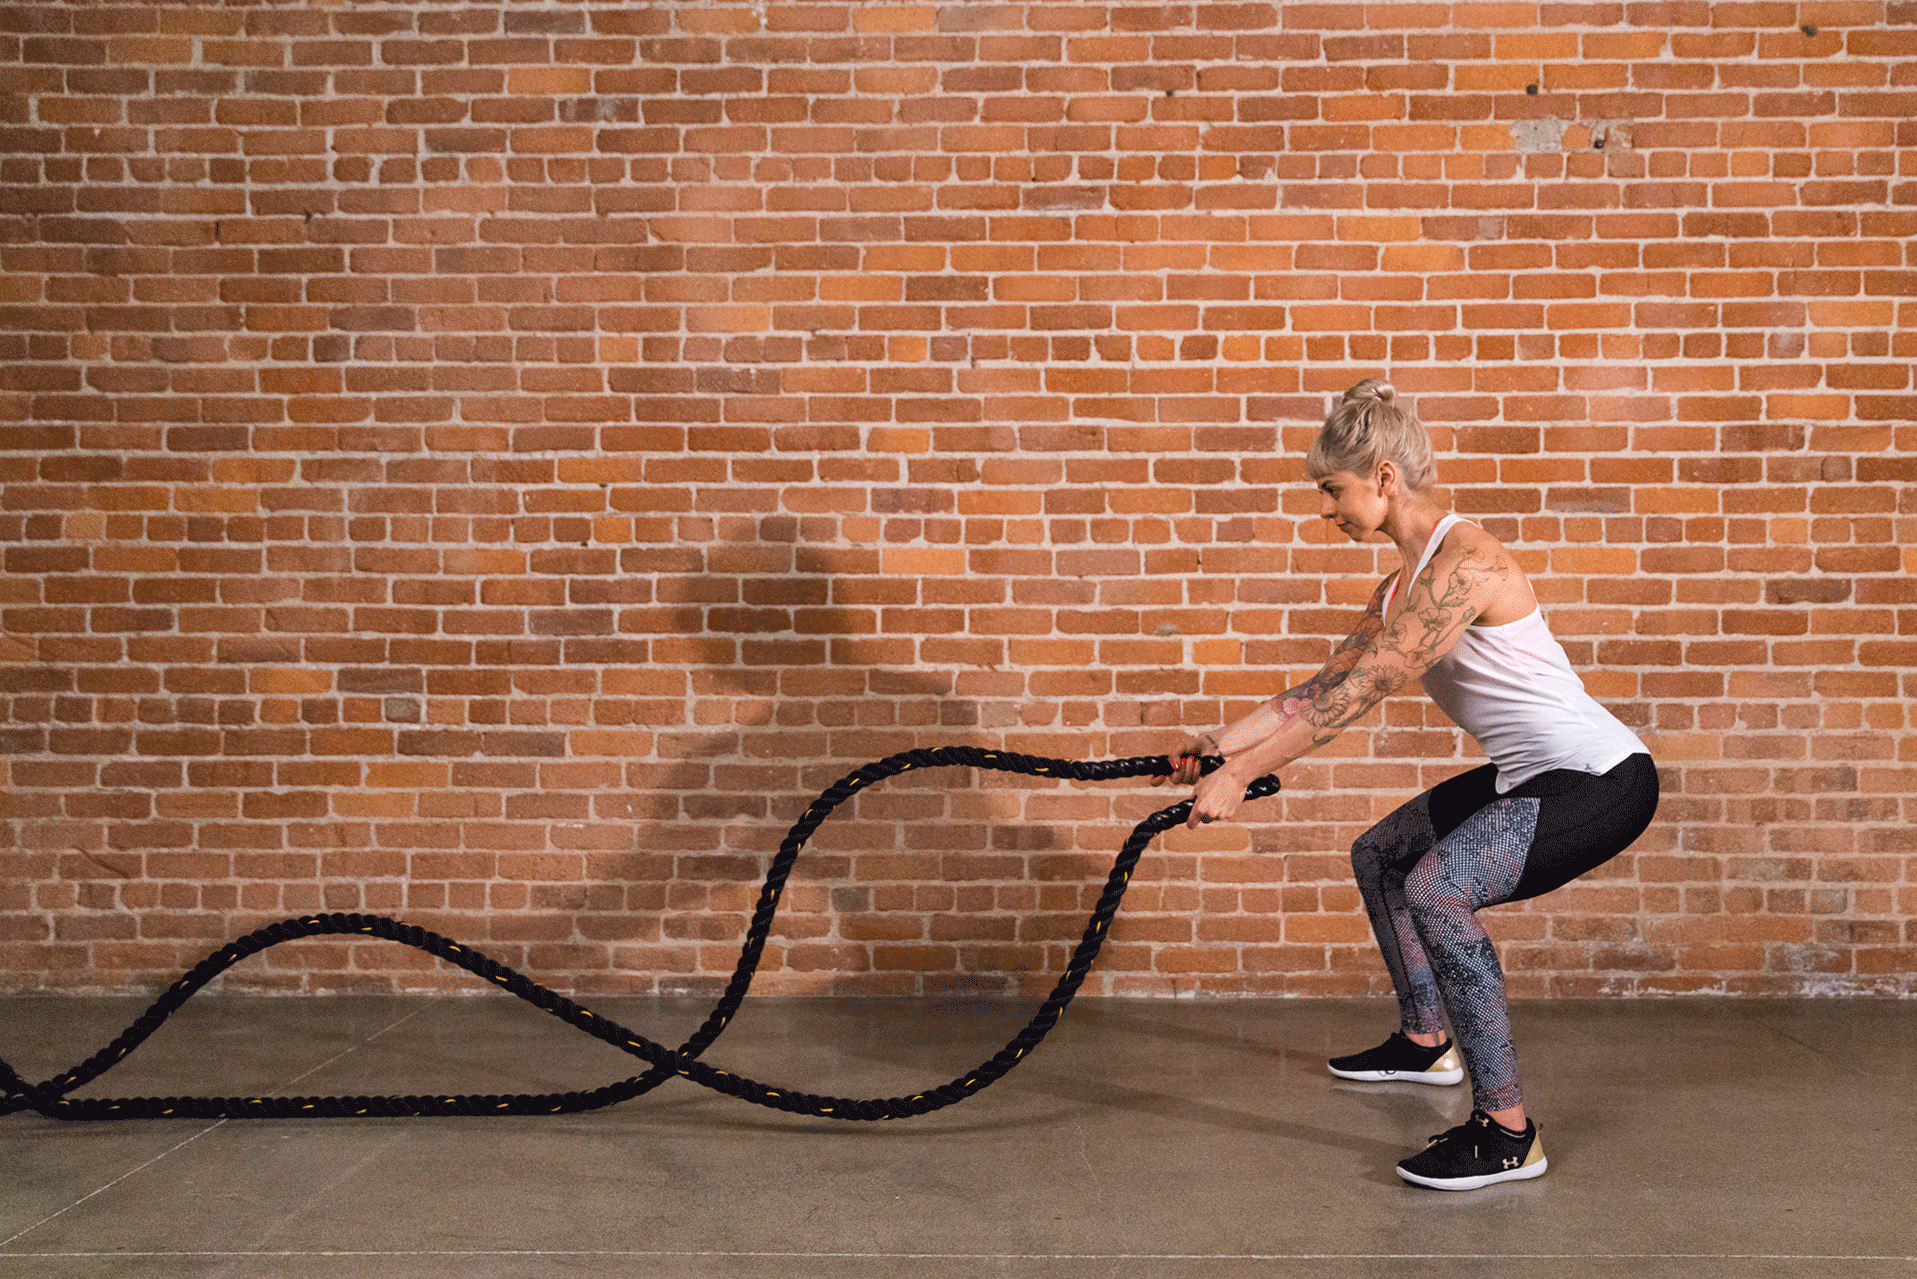
How to do it:
Grasp the ends of the battling ropes with an overhand grip. Take a slight knee bend and an athletic stance. Cycle the arms in a running pattern (lips to hips) with speed and power, creating alternating waves with the rope, all while keeping a strong core and stable spine.
MEDICINE BALL OVERHEAD SLAMS
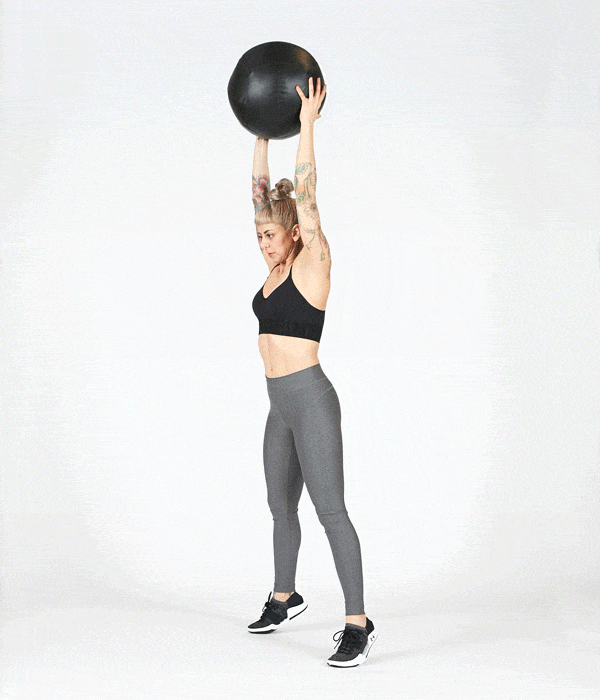
How to do it:
With feet slightly wider than shoulder-width apart, reach the heavy med ball above your head and stand on your toes to create a stretch. Drop the hips down and back (this creates the energy) and slam the medicine ball down to the ground as hard as you can. Be ready to catch as it bounces back up. Take advantage of the upward momentum, and allow that to create another overhead stretch and repeat.
Check out “Workout Routines” in the MyFitnessPal app to discover and log workouts or build your own with exercises that fit your goals.


