Now that summer has come to an end, and three carefree months on our bikes, at the lake and on the trails are in the rearview mirror, many of us are experiencing a bit of a fitness hangover. It’s a culmination of the little aches and pains (not to mention mild fatigue) that come after drinking up plenty of fun in the sun.
Which is why, now that we’re back to our regular routines at work, home and school, taking some time off from exercise sounds pretty tempting.
Complete rest is an option, of course, and really listening to your body is always wise. In many cases, though, your system will likely recover more quickly, and you’ll come back even stronger, if you spend some of your downtime on what is commonly referred to as “recovery workouts.”
The term might sound like an oxymoron, but when you’re stiff, sore or injured, explains Brian Bradley, vice president of Egoscue in San Diego, your body naturally compensates to avoid pain. The problem is that those postural adjustments often cause problems away from the original stress or injury. For example, he says, “if you injure your Achilles’ tendon, you start to compensate in the ankle and hip on the same side and the shoulder on the opposite side.”
Smart recovery workouts minimize these compensations by improving stability, opening up stiff areas, and improving head-to-toe posture and alignment, a process that helps avoid compounding minor injuries and hiccups in the healing process.
Recovery workouts, done correctly, can also safeguard against new injuries. Sports-related discomfort often results when your joints are subtly misaligned due to habit, past injuries, and hours spent sitting in front of computers and televisions. The harder and more frequently you stress these poorly aligned joints, the more achy and out-of-whack they become. So even if you’re pain-free, improving your posture and alignment will sharpen your form and help avoid needless stresses to the body, regardless of your athletic endeavors or leisure-time activities.
The following recovery workout uses exercises drawn from the Egoscue Method—a system of corrective movements designed to address common misalignments, improve posture and relieve chronic pain. It doesn’t take long to execute (20 minutes at most), but you’ll sit, stand and move more comfortably when you’re done. “Getting your head and your feet in the right position helps the joints in the middle do their jobs better so the whole body functions as a well-oiled, efficient machine,” Bradley says.
Do the moves for a month, once a day if possible, and you will likely start to notice substantial changes in other areas as well. In addition to having better posture, students who have participated in the Egoscue program long-term report improvements in sleep habits, digestion and immune function.
The workout below doesn’t require equipment and probably won’t even make you sweat, so it’s perfect after a period of intense exercise, on an off day or anytime you need a break from extra-rigorous movement. In the gym, you can use the moves as a warm-up or a cool-down, or as filler exercises between sets of more challenging exercises. It’s almost impossible to overdo it on these moves, so feel free to do some of them whenever the impulse strikes. Perform the exercises in a slow and focused manner. At most, you should feel a gentle, pleasant stretch, never an intense pulling or straining.
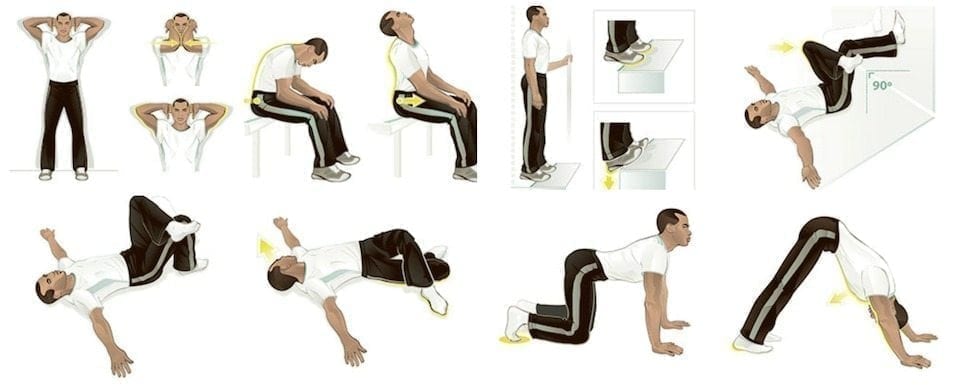
 1. STANDING ELBOW CURLS
- Stand with your back against a wall, feet parallel and hip-width apart, making sure that your heels, buttocks, upper back and the back of your head all touch the wall and remain there throughout the exercise.
- With your hands in loose fists and your thumbs extended downward, place the knuckles of both hands against your temples.
- Spread your elbows out as wide as you can, touching the wall if possible. This is your starting position.
- Keeping your knuckles near your temples, squeeze your elbows toward one another in front of you, touching them if possible.
- Reverse the movement, spreading your elbows wide again, and touching the wall if you can. That’s one rep.
Reps: 25 Coaching Points: Keep your elbows at shoulder height throughout; don’t let them drop toward the floor. Purpose: Teaches proper alignment of ankles, hips and spine while the upper back flexes and extends; mobilizes upper spine.
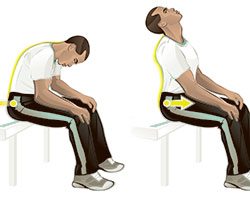 2. SITTING CATS AND DOGS
- Sit upright on a chair, stool or bench with your hands in your lap or hanging loosely at your sides, your feet parallel and hip-width apart. If your chair has a back, don’t lean into it; sit on the front edge of the seat.
- Slowly roll the tops of your hips backward, rounding your lower back and allowing your head to tip forward so you are looking down at your lap.
- Slowly roll the tops of your hips forward, arching your lower back and allowing your head to tip backward so you can look at the ceiling. That’s one rep.
Reps: 10 Coaching Points: Draw your shoulders downward, away from your ears, while you perform the movement, and focus on the movement in the hip joints. Purpose: Teaches proper forward- and backward-bending mechanics throughout the entire spine and pelvis.
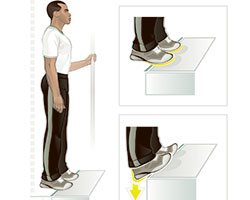 3. GRAVITY DROP
- Stand facing a stairway, or behind an aerobic step at least 6 inches tall.
- Step the balls of your feet onto the first stair with heels extended over the edge, holding on to the railing (or something else solid) for support.
- With your feet parallel and hip-width apart, your gaze forward, your shoulders square and your lower back in its natural arch, allow your heels to drop so that the balls of your feet are on the stair and your heels are pushing down toward the floor.
Duration: Hold dropped position at least three minutes. Coaching Points: Keep your weight back over your heels for the entire three minutes. When you do this move correctly, you’ll feel like you’re going to fall backward unless you hold on to something for support. Make sure to wear shoes with traction. Purpose: Encourages proper “stacking” of the largest joints in the body: ankles, knees, hips, spine and neck, while stretching and extending the calf muscles.
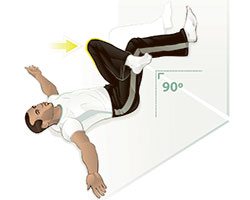 4. ASSISTED HIP STRETCH
- Lie on your back on a firm surface with your feet flat against a wall, lower legs parallel to the floor, feet hip-width apart and parallel.
- Extend your arms directly out to the side in line with your shoulders, palms facing up.
- Keeping your spine aligned, your sacrum (the bony area on the back of your pelvis) on the floor and your right foot pointed directly upward, lift your left leg and place the outside of your left ankle just below your right knee.
Duration: One minute on each side. Coaching Points: Keep your arms and shoulders relaxed on the floor, and don’t allow your hips to shift toward either side when performing the movement. If your sacrum comes up off the floor during the stretch, slide away from the wall slightly. Purpose: Improves stability in the hips.
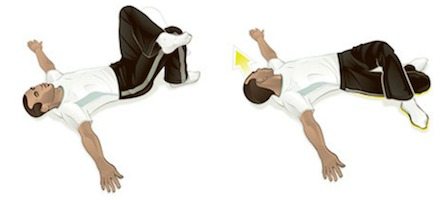 5. HIP CROSSOVER STRETCH
- Lie on your back with your knees bent, feet parallel and flat on the floor at about hip width.
- Extend your arms directly out to the side in line with your shoulders and place your palms flat on the floor.
- Cross your left ankle over your right leg and place it just below the knee.
- Slowly allow your right knee to fall to the right, rotating your spine and upper back until your left foot is resting flat and the outside of your right knee is on the floor.
- Keeping your lower body in this position and your shoulders relaxed on the floor, roll your head to your left as if to look toward your left hand.
- Repeat on the opposite site.
Duration: One minute on each side. Coaching Points: Keep the knee of your resting foot vertical throughout the exercise. Purpose: Improves your ability to rotate through the hips and spine while keeping your shoulder blades engaged.
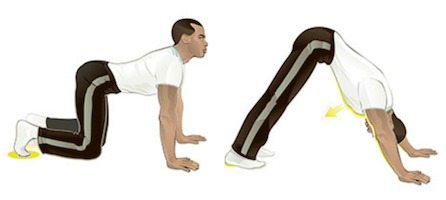 6. DOWNWARD DOG
- Assume an all-fours position.
- Lift your lower legs slightly and press the balls of your feet into the floor.
- Keeping your arms straight and your lower back in its natural arch, press your heels downward, and straighten your legs as much as possible.
- Breathe deeply throughout the stretch, strongly extending the arms and legs while pressing your chest toward the floor, keeping your head aligned with your spine and your elbows near the sides of your head.
Duration: One minute. Coaching Points: To sink deeper into the stretch, strongly contract the fronts of your thighs and focus on rolling the hips forward, while keeping your lower back arched and your legs straight. It’s OK if your heels don’t touch the floor. Purpose: Encourages proper engagement of the extensor muscles along the entire back side of your body.
—Andrea Heffernan for Experience Life